In this post, we are going to choose a database to use, then understand Docker just enough as we are going to use it throughout the series and learn how database connection works and what is connection pool. Finally, we will connect PostgreSQL to our Axum server. Let’s get started
Prerequisites
- Previous Post and the prerequisites
- Docker Installed
You can go to this Github repo to get the updated source code -> https://github.com/0xshadow-dev/realworld-axum-api
Deciding a Database
Before working on our project, we need to make a important decision and that is which database to use for our Medium API? We don’t want to just go with personal preference, we want to make a clear decision as different databases solve different problems. But we will only consider the most common databases for comparison as it’ll be easier to get help if we get stuck.
Understanding Database Types
There are multiple kinds of databases but let’s only focus on the 2 main types that are used to build a API:
Relational Databases (SQL)
MySQL, PostgreSQL, SQLite are some of the databases that come under this type. These databases store data in the form of tables and create relationships using foreign Keys.
-- Example: User and Article relationship
Users Table:
| id | username | email          |
|----|----------|----------------|
| 1  | john     | [email protected]  |

Articles Table:
| id | title     | author_id | content |
|----|-----------|-----------|---------|
| 1  | "Hello"   | 1         | "..."   |
Here, we have two tables, Users table is representing each user’s data while Articles table is representing each article’s data. The author_id is the foreign key and using this we are connecting user with their articles.
NoSQL Databases
MongoDB, Redis, DynamoDB are some of the NoSQL databases. These databases store data in various formats (documents, key-value, graphs). These are schema-less and can store different data shapes.
// Example: MongoDB document
{
  "_id": "507f1f77bcf86cd799439011",
  "username": "john",
  "email": "[email protected]",
  "articles": [
    {
      "title": "Hello",
      "content": "...",
      "tags": ["intro", "welcome"]
    }
  ]
}
We are doing the same thing here but here we are getting the data in a single document.
Analyzing Our Medium API Requirements
Let’s first understand what our Medium API needs and then we can decide which database to go with:
Data relationships we need:
- Users can follow other Users
- Users write Articles
- Articles have Tags (many-to-many relationship)
- Users can favorite Articles
- Users can comment on Articles
Data consistency requirements:
- When a user is deleted, their articles should be handled properly
- Favorite counts must be accurate
- Following relationships must be consistent
Query patterns we’ll need:
- Complex filtering: “Show me articles by authors I follow, tagged with ‘javascript’”
- Aggregations: “Count of favorites per article”
- Joins: “Get article with author info and tags”
SQL vs NoSQL for Our Use Case
Looking at our requirements, we have highly interconnected data with complex relationships. SQL databases are great at managing relationships through foreign keys and can handle complex queries with joins efficiently. NoSQL databases would require us to handle data consistency in our application code and would need multiple queries for complex operations like “get articles by followed users with their tags.”
For our Medium API with its complex relationships and need for data consistency, SQL is the clear choice.
Choosing Between SQL Databases
Now that we have decided to go with SQL database, now we need to pick between PostgreSQL, MySQL, and SQLite. I’m leaving out other lesser known databases.
SQLite is ruled out immediately because it only supports single writers, which won’t work for a web API that needs to handle concurrent requests.
PostgreSQL vs MySQL: Both are solid choices, but PostgreSQL has advantages for our use case. It handles complex queries better, has richer data types (UUID, arrays, JSONB), and has excellent Rust ecosystem support with SQLx providing compile-time query checking.
PostgreSQL can efficiently handle queries like this:
SELECT a.title, u.username, array_agg(t.name) as tags
FROM articles a
JOIN users u ON a.author_id = u.id
JOIN article_tags at ON a.id = at.article_id
JOIN tags t ON at.tag_id = t.id
WHERE u.id IN (SELECT followed_id FROM follows WHERE follower_id = $1)
GROUP BY a.id, u.username;
Why Only 1 Database and Not Multiple Databases?
We are actually going to use multiple databases in future but for now we are sticking with 1 database because this is a good start and later if needed we will break it down and put data in multiple DBs. Like lets say we are adding a caching layer in future, then we might use Redis for that or there might be some other usecase that we are not thinking about, then we can add another database for that usecase. So, lets not overthink this and start with 1 database.
So, lets go with PostgreSQL, it gives us the best combination of performance for complex queries, data consistency, and excellent Rust tooling.
Ok, now lets quickly understand some basics on Docker. I won’t explain it in depth as you might get bored, I want this to be more hands on and less theory.
Understanding Docker While Setting up Our Database
I hope you’ve installed Docker, if not, then please do that and then come back. Before setting up our database, lets’ first understand what Docker really is and why we need it.
I won’t explain all the Docker concepts at once here. We will eventually learn a lot of Docker concepts as and when needed. In this lesson, we will keep it simple and use Docker only to setup our PostgreSQL database. If you want to dive deep, then there are some great youtube videos, please feel free to learn and comeback, if that’s what you prefer.
The Problem Docker Solves
Let’s say you want to install PostgreSQL on your computer. You’d need to:
- Download the installer
- Configure it properly
- Setup users and permissions
- Remember to do all these steps to do it again on another machine
Now, lets think of a scenario where we are working in a team and everyone has different os, different versions of PostgreSQL installed, different config. Your PostgreSQL setup might work perfectly fine on your machine but might fail completely on other systems.
This is what we call “it works on my machine” problem.
What Docker Actually Does
Docker actually solves the above issue by creating isolated environments called containers.
Think of it like a box that contains everything that is required to run the application that we want to run:
- The application you want to run (PostgreSQL)
- Everything that application needs to work (libraries, dependencies, configuration)
- A mini operating system environment
This box runs the same way on any computer that has Docker installed.
Now, that we understood what it is and what it solves, lets understand some of its core concepts while setting up our PostgreSQL database.
Core Concept 1: Images
A Docker Image is like a snapshot of a complete software setup. In this case, where we need to use PostgreSQL in Docker, we will download an image, that’ll contain:
- PostgreSQL database software with a specific version
- All the libraries PostgreSQL needs
- The operating system files PostgreSQL requires
- Default configuration
Think of it like a USB drive with a complete, ready to run software installation.
Let’s start by downloading the PostgreSQL image.
docker pull postgres:15Core Concept 2: Containers
A container is what you get when you take an image and actually run it. It’s the actual running version.
To make this clear, let me explain the relationship between an image and a container:
- Image is like the software package sitting on our disk (like a .exe file)
- Container is like the running program (when you double click on the .exe)
Core Concept 3: Isolation
So, when we will run PostgreSQL in our container:
- it can’t see our personal files
- it can’t interfere with other software on our computer
- it thinks its running on its own dedicated computer (isolation)
- if it crashes or gets corrupted, it doesn’t affect our computer or any other container.
This is actually a very good thing, it’s like how tabs work on a browser. If one tab crashes, it won’t crash all other tabs or the browser.
But there is one issue with this isolation.
Core Concept 4: Port Mapping
Because containers are isolated, we can’t normally reach applications (like PostgreSQL) running inside them.
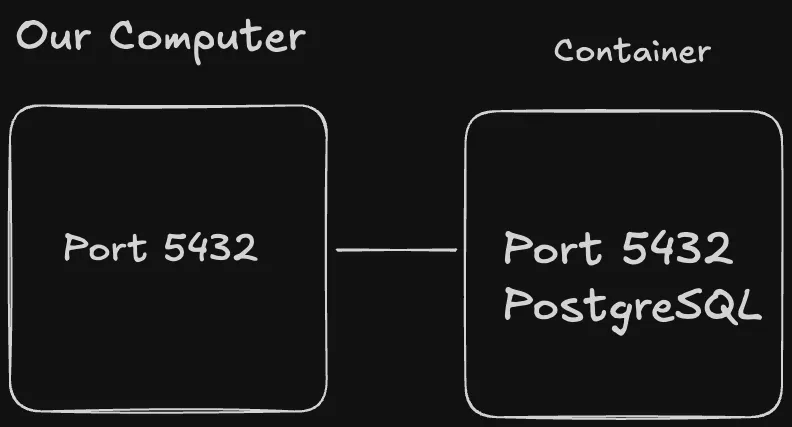
To reach those applications, we need to create a network bridge using what we call as Port mapping. Port mapping creates a bridge between our computer and the container.
Now, when our Axum API will try to connect to localhost:5432 for database connection, Docker will forward that connection into the container.
Ok, now that we have covered some core concepts, lets start a container from our previously installed PostgreSQL image.
Run the following command on your terminal and don’t worry I’ll explain what is this doing in detail.
docker run --name realworld-db \
  -e POSTGRES_PASSWORD=realworld123 \
  -e POSTGRES_USER=realworld \
  -e POSTGRES_DB=realworld_dev \
  -p 5432:5432 \
  -d postgres:15
docker runcreates and starts a container--name realworld-dbis used to give the container a name that we can remember-eflag is used to set environment variables- We set 3 environment variables one for password, one for user and one for db name. PostgreSQL needs these 3 environment variables, its not specific to Docker.
-pis used for port mapping, as explained we are create a port mapping of port5432because this is what PostgreSQL uses as its default port.-dflag is used to run this entire thing in the backgroundpostgres:15is used as this is the image that we are using
Run the above command and then you’ll see an output like this:
a1b2c3d4e5f6789abc...This long string is your container ID, if you’re seeing something like this then your container is up and running.
We can also check our running containers using the below command:
docker psYou should see something like this:
CONTAINER ID   IMAGE        STATUS      PORTS                    NAMES
a1b2c3d4e5f6   postgres:15  Up 1 min    0.0.0.0:5432->5432/tcp   realworld-db
Let me explain what this output means:
- It shows our container ID
IMAGEis showing what image the container is usingSTATUSis showing its running statusPORTSis showing our port mapping- Finally it shows our container name
With this, we are successfully running a container that is running PostgreSQL 15. Let’s check our PostgreSQL database is actually working by connecting to it.
Testing Our PostgreSQL Connection
bash
docker exec -it realworld-db psql -U realworld -d realworld_dev
Let’s break down this command to understand what each part does:
Understanding docker exec
docker exec -it realworld-dbdocker exec- This command runs a new command inside an already running container-iflag - Keeps the input stream open (interactive mode)-tflag - Allocates a pseudo-terminal (gives you a proper terminal interface)realworld-db- The name of our container where we want to run the command
Think of docker exec as a way to “step inside” your running container and execute commands as if you were sitting at that container’s terminal.
Understanding psql
psql -U realworld -d realworld_devpsql- PostgreSQL’s command-line interface (CLI) tool for interacting with databases-U realworld- Connect as user “realworld” (the user we created with our Docker environment variable)-d realworld_dev- Connect to the database named “realworld_dev” (the database we created with our Docker environment variable)
What happens when you run this command:
Docker finds the running container named “realworld-db”, executes the psql command inside the container, then psql connect to PostgreSQL using the username and database and finally we get a interactive PostgreSQL session
You should now see something like this:
psql (15.x)
Type "help" for help.

realworld_dev=#
psql (15.x)- Confirms you’re running PostgreSQL version 15realworld_dev=#- This is the PostgreSQL prompt showing that we are connected to the realworld_dev database
If this is what you are seeing, then congrats, we’re now connected to PostgreSQL inside our Docker container. Type \q to exit.
Container Lifecycle Management
Let’s learn one last thing for containers.
To stop the container:
docker stop realworld-dbTo check status
docker ps -aTo start the container
docker start realworld-dbStopping a container preserves the data inside the container. Only removing the container(docker rm) deletes everything. If it similar to how stopping a application in your computer won’t remove its data from the application but if you’ll uninstall that application, then it’ll remove the data completely.
Connecting Axum to PostgreSQL
Now, that we have PostgreSQL running, it’s time to connect our Axum web server to it.
Adding Database Dependencies
Let’s start by adding the dependencies to our Cargo.toml. Keep everything the same just add these 4 new dependencies:
sqlx = { version = "0.8", features = ["runtime-tokio-rustls", "postgres", "uuid", "chrono", "migrate"] }
uuid = { version = "1.0", features = ["v4", "serde"] }
chrono = { version = "0.4", features = ["serde"] }
dotenvy = "0.15"runtime-tokio-rustls: Use Tokio async runtime with TLS encryption for secure database connectionspostgres: PostgreSQL database driveruuid: Support for UUID data types (we’ll use these for unique IDs)chrono: Date and time handling for timestampsmigrate: Database migration support for creating/updating tablesuuid: Generate unique identifiers for users, articles, commentschrono: Handlecreated_at,updated_attimestamps in our datadotenvy: Load environment variables from .env files
Understanding Database Connections and Connection Pools
Before we write any code, let’s first understand briefly about an important concept related to database connection.
So, when our server needs to do some operation in a database, it creates a connection using username and password authentication, then our api sends SQL queries, then database send back the results and finally the connection is closed.
For a single request, this is fine. But as web servers handles multiple requests simultaneously, it creates a problem.
Problem with Individual Connections
Let’s think of a scenario where our API is getting 100 requests per second. If each request creates its own database connection, then this is what it’ll look like:
Request 1: Connect → Query → Disconnect
Request 2: Connect → Query → Disconnect
Request 3: Connect → Query → Disconnect
...and so on
You might ask ok so what’s the problem in this? Isn’t this what’s supposed to happen? So, let’s discuss some problems with this approach.
- When one connection is created, a TCP socket creation and handshake happens, then PostgreSQL authentication happens using username and password, then a session initialization happens this is for setting timezone, encoding etc and finally memory allocation for connection state. This connection creation process takes up a good chunk of time hence increasing latency.
- PostgreSQL’s default
max_connectionssetting is typically 100. You can modify this number but each connection consumes somewhere between 2-8mb per connection and CPU resources. Just think about a situation where we have increased this default number to 1000 connections, PostgreSQL might use 2-8GB just for connection overhead.
Let’s run through a rough example that’ll show us how if we can eliminate this connection creation for each request, then we can improve our performance both in terms of latency and memory usage.
Let’s run through a typical web server request lifecycle:
1. User clicks "Get Articles" button
2. HTTP request reaches your server           [0ms]
3. App creates database connection           [20ms]  ← Connection overhead
4. App authenticates with database           [10ms]  ← Authentication overhead
5. App sends SQL query                       [1ms]   ← Actual work
6. Database processes query                  [5ms]   ← Actual work
7. Database returns results                  [1ms]   ← Actual work
8. App closes database connection            [5ms]   ← Connection overhead
9. App sends HTTP response                   [1ms]
You can see the total time we took to finish this request is 43ms but the actual operation time in our database was only for 7ms. We spent 20ms on database connection, 10ms on authentication and finally 5ms on closing the connection.
If we can eliminate this need of creating the connection for most of our requests, then we can improve a lot.
To do this, we have a concept known as Connection Pooling.
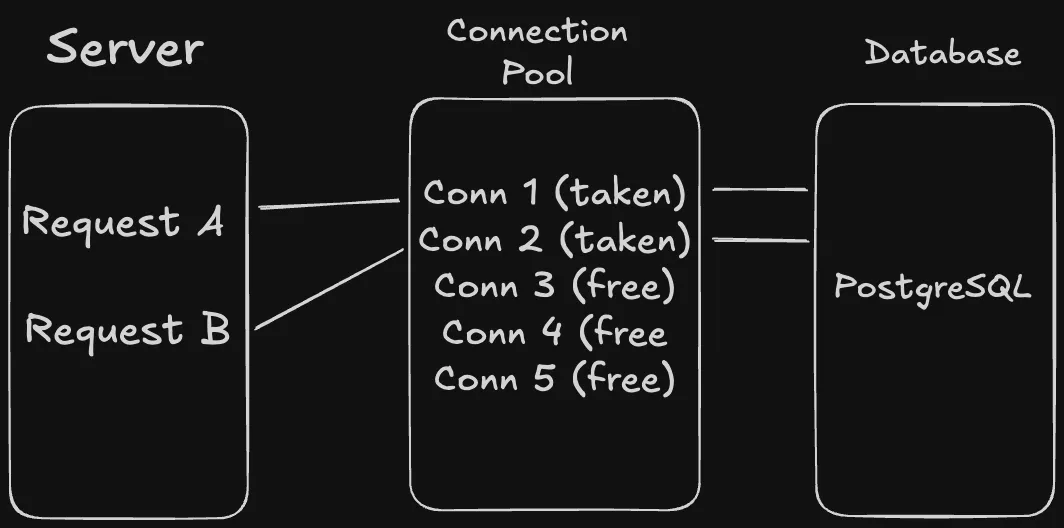
Connection Pooling
A connection pool is a cache of database connections that are kept open and ready to use. Instead of creating new connections for each request, our application borrows from this pool of pre-established connections.
Let’s now understand how connection pooling works.
Once our server starts, it’ll create 5-10 connections to PostgreSQL, the number depends on the configuration that we have set otherwise the default number of connections will be there. Then, it’ll authenticate each connection and keep them open and ready to use. Finally it’ll put all those connections in a “pool” (queue) for use.
Let’s again run through a request lifecycle to understand clearly what will happen when a request comes in.
- Request arrives: “I need to query users table”
- App asks pool: “Give me an available connection”
- Pool responds: “Here’s connection #3, it’s ready to use”
- App uses connection #3 to run SQL query
- App gets results
- App tells pool: “I’m done with connection #3”
- Pool marks connection #3 as available again
Connection #3 never gets closed. It stays connected to PostgreSQL and gets reused by the next request.
Now, you might be thinking, what will happen when the connection pool is exhausted? If all the connection in the pool are in use and a new request comes in, then there are different ways to handle that. We won’t go through all those ways here but we will do that practically when we will learn about performance tuning.
One way is to increase the connection pool but it’ll use more database resources. Another is to put the new request in a wait queue. Connection pool has a timeout duration for each request, lets say 30 seconds. If it can’t serve the request in 30 seconds, it’ll give a timeout error.
I hope with this you understood it clearly why we use connection pooling and how it is better in terms of performance in comparison to individual connections.
Man, that’s a lot of theory, now, lets get back into coding and start connecting our database to our server.
Environment Configuration with .env File
Before we create our application state, let’s set up proper environment configuration. Create a .env file in your project root (same directory as Cargo.toml):
# .env
DATABASE_URL=postgresql://realworld:realworld123@localhost:5432/realworld_dev
This file will store our database connection string securely and keep it out of our source code.
Also create a .env.example file so that we can show the format without exposing real credentials:
# .env.example
DATABASE_URL=postgresql://username:password@localhost:5432/database_name
Then create or update your .gitignore file to exclude the .env file:
# .gitignore
/target
.env
This make sure that our database credentials don’t get committed to version control.
Creating Application State
Create a file inside the src directory and name it state.rs Here’s the complete code for src/state.rs:
use sqlx::PgPool;

#[derive(Clone)]
pub struct AppState {
    pub db: PgPool,
}

impl AppState {
    pub async fn new(database_url: &str) -> Result<Self, sqlx::Error> {
        let db = PgPool::connect(database_url).await?;
        Ok(Self { db })
    }
}
As we discussed earlier, we can configure the connection pool but for now we are not doing that and keeping everything at its default value, we will change config in a future post while working on performance tuning.
Let’s now understand the above code block by block.
Imports
use sqlx::PgPool;Import the PostgreSQL connection pool type from SQLx. I’ll explain SQLx eventually as we will build our database schema. So, don’t worry about it.
The AppState Struct
#[derive(Clone)]
pub struct AppState {
    pub db: PgPool,
}
Here’s where we solve the shared data problem. In web applications, we need the same resources (like database pools) available to all request handlers. Without this shared state approach, each handler would need to create its own database connection:
// BAD: Each handler creates its own connection
async fn get_user() {
    let db = connect_to_database().await; // Slow! Creates new pool every time
    // Use database...
}

async fn create_article() {
    let db = connect_to_database().await; // Slow again! Another new pool
    // Use database...
}
Instead, our AppState struct holds shared application data that all handlers can access:
AppStateis our container for shared application resourcesPgPoolis our database connection pool that gets shared across all requests#[derive(Clone)]is crucial - it allows us to copy this struct efficiently. SQLx pools useArc(atomic reference counting) internally, so cloning just copies a reference, not the entire poolpubmakes this accessible from other modules
This way, hundreds of handlers can all use the same connection pool:
// GOOD: All handlers share the same pool
async fn get_user(State(app_state): State<AppState>) {
    let db = &app_state.db; // Fast! Uses existing shared pool
    // Use database...
}

async fn create_article(State(app_state): State<AppState>) {
    let db = &app_state.db; // Fast! Same shared pool
    // Use database...
}
The Constructor Function
impl AppState {
    pub async fn new(database_url: &str) -> Result<Self, sqlx::Error> {
        let db = PgPool::connect(database_url).await?;
        Ok(Self { db })
    }
}
This constructor function creates our shared state once at application startup:
- Takes a database URL (like our PostgreSQL connection string)
- Returns
Resultbecause database connection can fail asyncbecause connecting to database involves network I/OPgPool::connect()creates the connection pool and establishes initial connections to PostgreSQLawait?waits for connection and propagates any errorsOk(Self { db })wraps our pool in the AppState struct
This happens once when your application starts, not on every request. All future requests will use this same shared pool.
Updated main.rs
Here’s the complete updated src/main.rs:
use axum::{routing::get, Router};
use std::env;

mod handlers;
mod state;

use handlers::health::health_check;
use state::AppState;

#[tokio::main]
async fn main() {
    // Load environment variables from .env file
    dotenvy::dotenv().ok();

    let database_url = env::var("DATABASE_URL")
        .expect("DATABASE_URL must be set in .env file or environment");

    let app_state = AppState::new(&database_url)
        .await
        .expect("Failed to connect to database");

    println!("Connected to database successfully!");

    let app = Router::new()
        .route("/health", get(health_check))
        .with_state(app_state);

    let listener = tokio::net::TcpListener::bind("0.0.0.0:3000")
        .await
        .unwrap();

    println!("Server running on http://localhost:3000");

    axum::serve(listener, app).await.unwrap();
}
Lets understand the above code block by block.
Module Imports
mod handlers;
mod state;

use handlers::health::health_check;
use state::AppState;
Import our new state module and the AppState struct.
Loading Environment Variables
dotenvy::dotenv().ok();This loads all variables from your .env file into the environment. The .ok() means it won’t crash if the file doesn’t exist (useful for production where you might set env vars differently).
Reading the Database URL
let database_url = env::var("DATABASE_URL")
    .expect("DATABASE_URL must be set in .env file or environment");
Now we read the DATABASE_URL from environment variables. If it’s not found, the program crashes with a clear error message telling you what’s missing.
The connection string breakdown:
postgresql://- Database protocolrealworld:realworld123- Username and password (from our Docker-eflags)@localhost:5432- Host and port (Docker port mapping)/realworld_dev- Database name (from Docker-e POSTGRES_DB)
Creating Shared State
let app_state = AppState::new(&database_url)
    .await
    .expect("Failed to connect to database");
This is where we create our shared state that will be used by all handlers:
AppState::new()callsPgPool::connect()internally- SQLx creates the connection pool (usually 10 connections by default)
- Each connection authenticates with PostgreSQL
- If successful, we get an AppState with a ready-to-use pool
- If it fails,
expect()crashes the program with “Failed to connect to database”
Why crash on database failure? An API without a database can’t function, so it’s better to fail fast than serve broken responses.
Sharing State with Handlers
let app = Router::new()
    .route("/health", get(health_check))
    .with_state(app_state);
The crucial line: .with_state(app_state) This tells Axum: “Make this AppState available to any handler that requests it.” This is how we distribute our shared database pool to all handlers. Every time a request comes in, Axum can provide this state to handlers that ask for it.
Updated Health Check Handler
Here’s the complete updated src/handlers/health.rs:
use axum::{extract::State, Json};
use serde_json::{json, Value};
use crate::state::AppState;

pub async fn health_check(State(state): State<AppState>) -> Json<Value> {
    match sqlx::query("SELECT 1").execute(&state.db).await {
        Ok(_) => Json(json!({
            "status": "ok",
            "database": "connected"
        })),
        Err(e) => {
            eprintln!("Database error: {}", e);
            Json(json!({
                "status": "error",
                "database": "disconnected",
                "error": e.to_string()
            }))
        }
    }
}
New Imports
use crate::state::AppState;Updated Handler Signature
pub async fn health_check(State(state): State<AppState>) -> Json<Value> {Here’s where the shared state gets used by a handler:
State(state): State<AppState>- This is Axum’s state extraction mechanism- Axum sees we want
AppStateand automatically provides it from what we passed to.with_state()in main.rs statenow contains our shared database connection pool- Multiple requests can call this handler simultaneously, all using the same shared pool
asyncbecause we’ll make database calls
Database Test Using Shared Pool
match sqlx::query("SELECT 1").execute(&state.db).await {The database test using our shared pool:
sqlx::query("SELECT 1")creates a simple SQL querySELECT 1is a standard database “ping” - it just returns the number 1- It’s fast, simple, and doesn’t require any tables to exist
.execute(&state.db)runs the query using our shared connection poolawaitwaits for the database to respond
What happens behind the scenes:
&state.dbis our shared connection pool- Pool finds an available connection (or waits if all are busy)
- Query gets sent to PostgreSQL through that connection
- PostgreSQL processes
SELECT 1and returns a single row with value1 - Connection automatically returns to the pool for reuse by other requests
- We get back a Result indicating success or failure
Success Response
Ok(_) => Json(json!({
    "status": "ok",
    "database": "connected"
})),
If the query succeeds:
- The
_means we don’t care about the actual query results - Return JSON indicating everything is working
Error Response
Err(e) => {
    eprintln!("Database error: {}", e);
    Json(json!({
        "status": "error",
        "database": "disconnected",
        "error": e.to_string()
    }))
}
If the query fails:
eprintln!logs the error to the console for debugging- Return JSON with error details
- Include the actual error message for troubleshooting
To end this post, lets quickly understand the flow.
Understanding the Complete Request Flow
When someone hits /health, this is what happens:
- Our curl command sends a GET request to port 3000
- The TCP listener accepts the connection
- Axum matches
/health+ GET method to yourhealth_checkhandler - Axum sees the handler wants
State<AppState>and provides it &state.dbborrows an available connection from the poolSELECT 1gets sent to PostgreSQL- PostgreSQL returns the result
- Connection automatically goes back to the pool
- Handler creates JSON response based on success/failure
- Axum sends the JSON back to your curl command
Testing Our Database Connection
Let’s test our complete setup:
-
Make sure PostgreSQL is running:
docker ps -
Start your Rust application:
cargo runYou should see:
Connected to database successfully! Server running on http://localhost:3000 -
Test the health endpoint:
curl http://localhost:3000/healthExpected response:
{
  "status": "ok",
  "database": "connected"
}
Conclusion
We understood a lot of things in this post. I think the major ones are docker and connection pooling. I’m really excited for the next one where we’ll create our first database table, learn about migrations, SQLx, schema design and set up proper error handling. We’re ready to start building the actual API features. See you soon.